Bulk Send feature allows users to easily send a standardized document to many recipients at one time. When using bulk send, it is important to leave time for adequate preparation and testing before executing a bulk send to make sure everything is in order. It is a best practice to first pilot a bulk send to a small group of test recipients before using the full and final recipient list helps catch potential errors and inconsistencies in the eventual signing experience.
To initiate a bulk send for your document, follow the 2-step process listed below:
Step 1: Prepare Your Template
Create a DocuSign template and upload your document to the template as usual. You may refer to our guide on how to create a template guide. Things that you should consider when setting up your document:
- Add one or more role recipients as required. Role recipients are designed to be filled in from the recipient data you specify in the bulk list and import to the envelope.
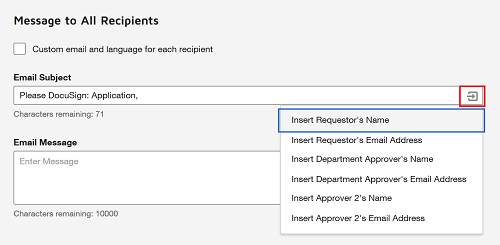
- Enter the message subject and the message for all signers directly on the template. It is recommended to customize envelope titles with recipient's name or email with merge fields. Click the merge field icon at the end of the subject field. The drop-down list contains options to insert the Name and Email Address for each recipient on the template.

- When you add recipient fields to your documents, you must define and label any fields specified in the bulk list, in order for the data in the list to be inserted into your sent documents.

